Atlantis 3 Developer Documentation
Introduction and Installation
What is Atlantis?
Atlantis is a CMS and a framework built on top of Laravel 5.x as a module of its own. It eases website administration and allows the average Internet user to operate and administer their website while also allowing technical users to use improve upon and rapidly create the web application that they need without starting from scratch, as many features that every web project needs come out of the box. Atlantis can be enhanced with modules (think of WordPress plugins but on top of Laravel's possibilities, code structure and organization and best practices), patterns (think of WordPress page templates but with the ability to insert multiple patterns into the end page and with the precise control where the patterns are applied).
Installation
If you are using Composer (and you should), all you need to install Atlantis 3 is the following line:
composer create-project atlantis-labs/atlantis3 --prefer-dist [foldername]This will install Atlantis and all the needed dependencies in your current working directory, adjust your folder permissions and it will provide you with 2 artisan commands that can be used to finish your installation of the framework. Those commands are the following:
php artisan atlantis:set:db - this will ask you questions regarding
your database connection
php artisan atlantis:install - this will ask you whether to run migrations
and seeds and you want to run them both at this point.
If you are installing Atlantis in a sub-folder you have to edit your .htaccess file's RewriteBase line and change it to reflect your setup, like /[folder]/ (note the trailing slash)
Auto Installation
There is one-click install now available using Softaculous installer. Normally you can find it with most of the cPanel shared hosting environments. This is a very easy way to start with Atlantis with just point-and-click. Additionally here is a direct link to Atlantis in Softaculous.
![]()
Administration Location
You can access your Atlantis Admin Panel by pointing your browser to /admin on your host.
Default user: admin. Default Password: admin123
First things first or after your first login
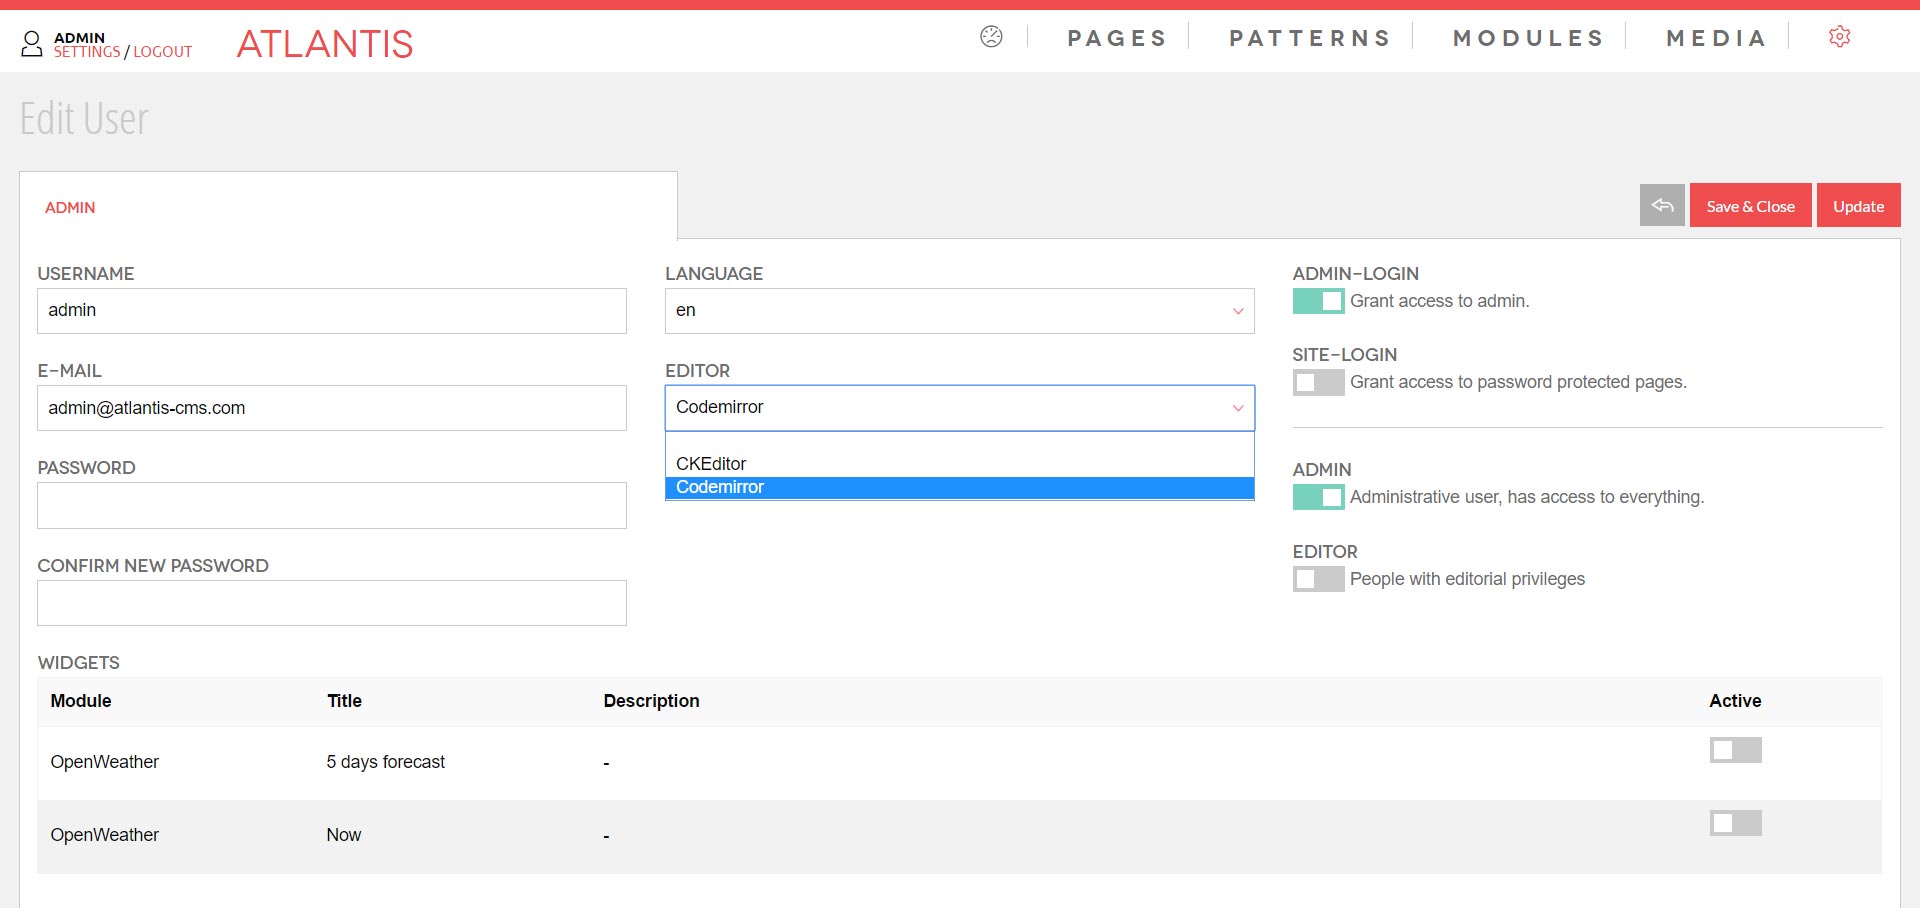
By default, Atlantis does not have any activated WYSIWIG editor for your profile . We leave that option to you, however in the modules repository tab you can find CKEditor a available but you need to install it and activate it first. The next step is to go into your profile settings on the top left side and in the editor dropdown choose CKEditor. You can of course at any point install different editor module and use it instead, just by changing your selection in your profile. At the moment, a module for the Codemirror editor is also available and ready for usage.
If you are into a multi user environment you would at this point probably want to create their profiles.
Multiuser page editing
Note that if multiple users are editing the same page the one who opened the page second will get a warning that the page is being edited by a different user and won’t let them save unless the first user releases the document lock via saving it.
Atlantis 3 comes with a few prebuilt roles but to make protected pages you need to give your users the ‘site login’ role. This role is designed to let users access protected pages on your site.
The file /config/page-protected.php is where you define how your site will deal with password protected pages, what route to use and where to direct users when login is needed.
When editing a page on the right hand side options you have to click ‘page protection’ to flag that the page requires login.
Working with Atlantis
What are patterns and how to use them?
Patterns are the building blocks of your pages that also provide a mechanism to load modules.
Atlantis has 3 types of patterns:
View
This type of pattern takes its content, puts it inside a view which you have selected and outputs it back to the system. It’s designed to provide more complex HTML structures that are predefined and the user just uses without the need to write any HTML. Each pattern of this type can also feature pattern specific attributes, which are basically custom fields that are used only in this pattern for more fine-grain control of your content and formatting. Again the view of the pattern needs to be coded in a way that features output for these fields. Let’s look at the following example:
{!! $text !!}This could be the structure of your pattern view. The $text variable always
represents the contents of the WYSIWYG editor. It’s hard-coded and you can’t change it.
Now, let’s imagine we need one custom variable that populates a different part of our view. First in the admin we will
add a new pattern custom attribute. Let’s make a name called ‘title’ and a value of
"my title". Your pattern view will change like this:
<div class="row">{!! $title !!}</div>
<div class="row">{!! $text  !!}</div>
And when outputted on the page the $title variable will hold
"my title". This is the way to extend the pattern views with custom variables.
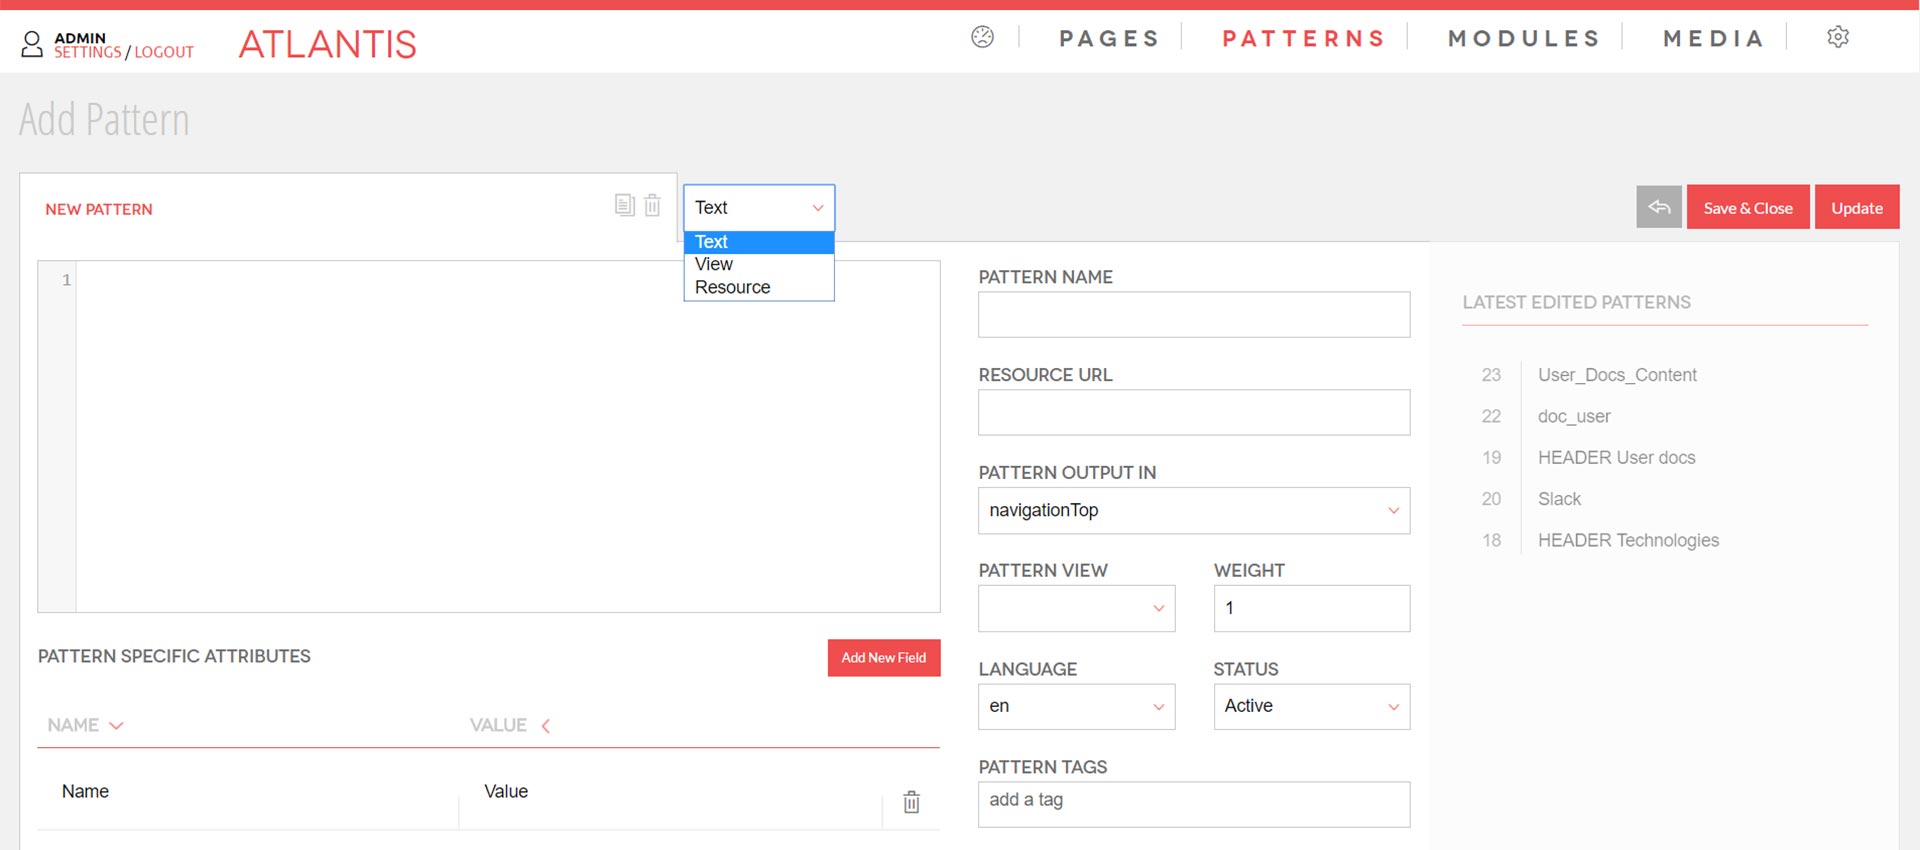
Text
This is the simplest form of dynamic content you can create. It just outputs the value of the WYSIWYG editor in the output with no additional formatting.
Resource
This loads a module on the page via a pattern. Please check the chapter Using the data tags in your pages to see how it’s done.
What are URL Masks?
URL masking is a way to display dynamic content at theme defined positions by using page URLs to specify on which pages this content shows and on which it does not.
Static Masks
The simplest form of a URL mask is just a string with the page URL like this: my-page
Root relativity
Note that we do not need to prepend the URLs with forward slash to denote root relativity.
If you save this as the URL mask your pattern will output only on a page with a URL of "my page" that features the theme position you have specified in “pattern output in” field. To add a mask, all you have to do Is create a new page from the path /admin/pages and enter the desired URL mask in the Page URL.
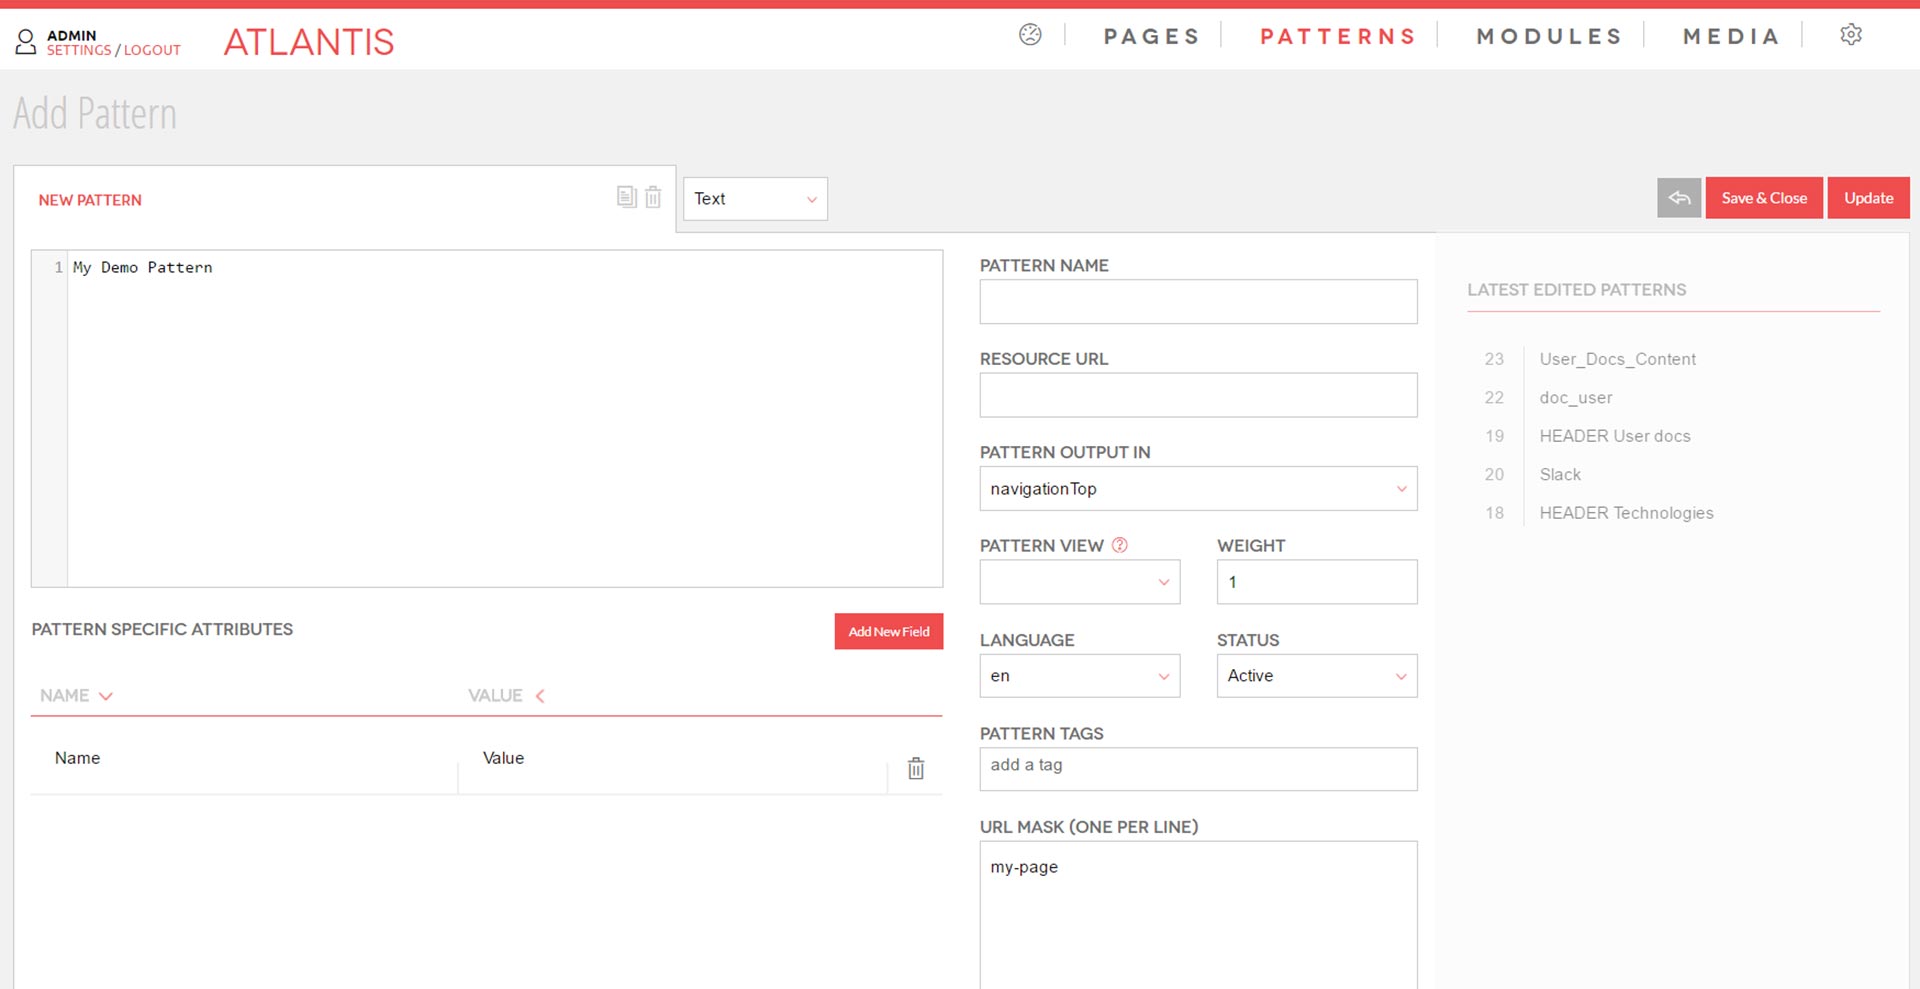
Using 'my-page' as the Page URL will make your server display the contents of that page only when the path /my-page is accessed.
Dynamic Masks
Inclusion
The mask for inclusion of paths in the URL is :any. The mask does what it says, it will include any URL as a valid mask. Here are a few samples: :any - save the pattern like this and it will output on any valid URL. my-page:any - this will fetch anything that starts with my-page as a valid mask result including my-page123 or my-page/123 ) my-page/:any - this will fetch only pages that start with /my-page/ but not my-page itself
Exclusion
! - the exclamation mark denotes paths which we want to exclude.
Examples
- !my-page - means my-page will not be a valid URL for this pattern
- !my-page/:all - only pages that start with my-page/ will be excluded but not my-page itself.
- :any - Any/all URLs will match
- :any!my-page - Any URL that is not my-page will match the HTTP request
- !my-page/:all - This pattern will be valid for all pages besides “/my-page”.
Calling Modules Through Patterns
Now the way more flexible and complex way of doing this is using an intermediary pattern. You want to do this in order to gain access to the flexibility of the URL masking that patterns already provide.
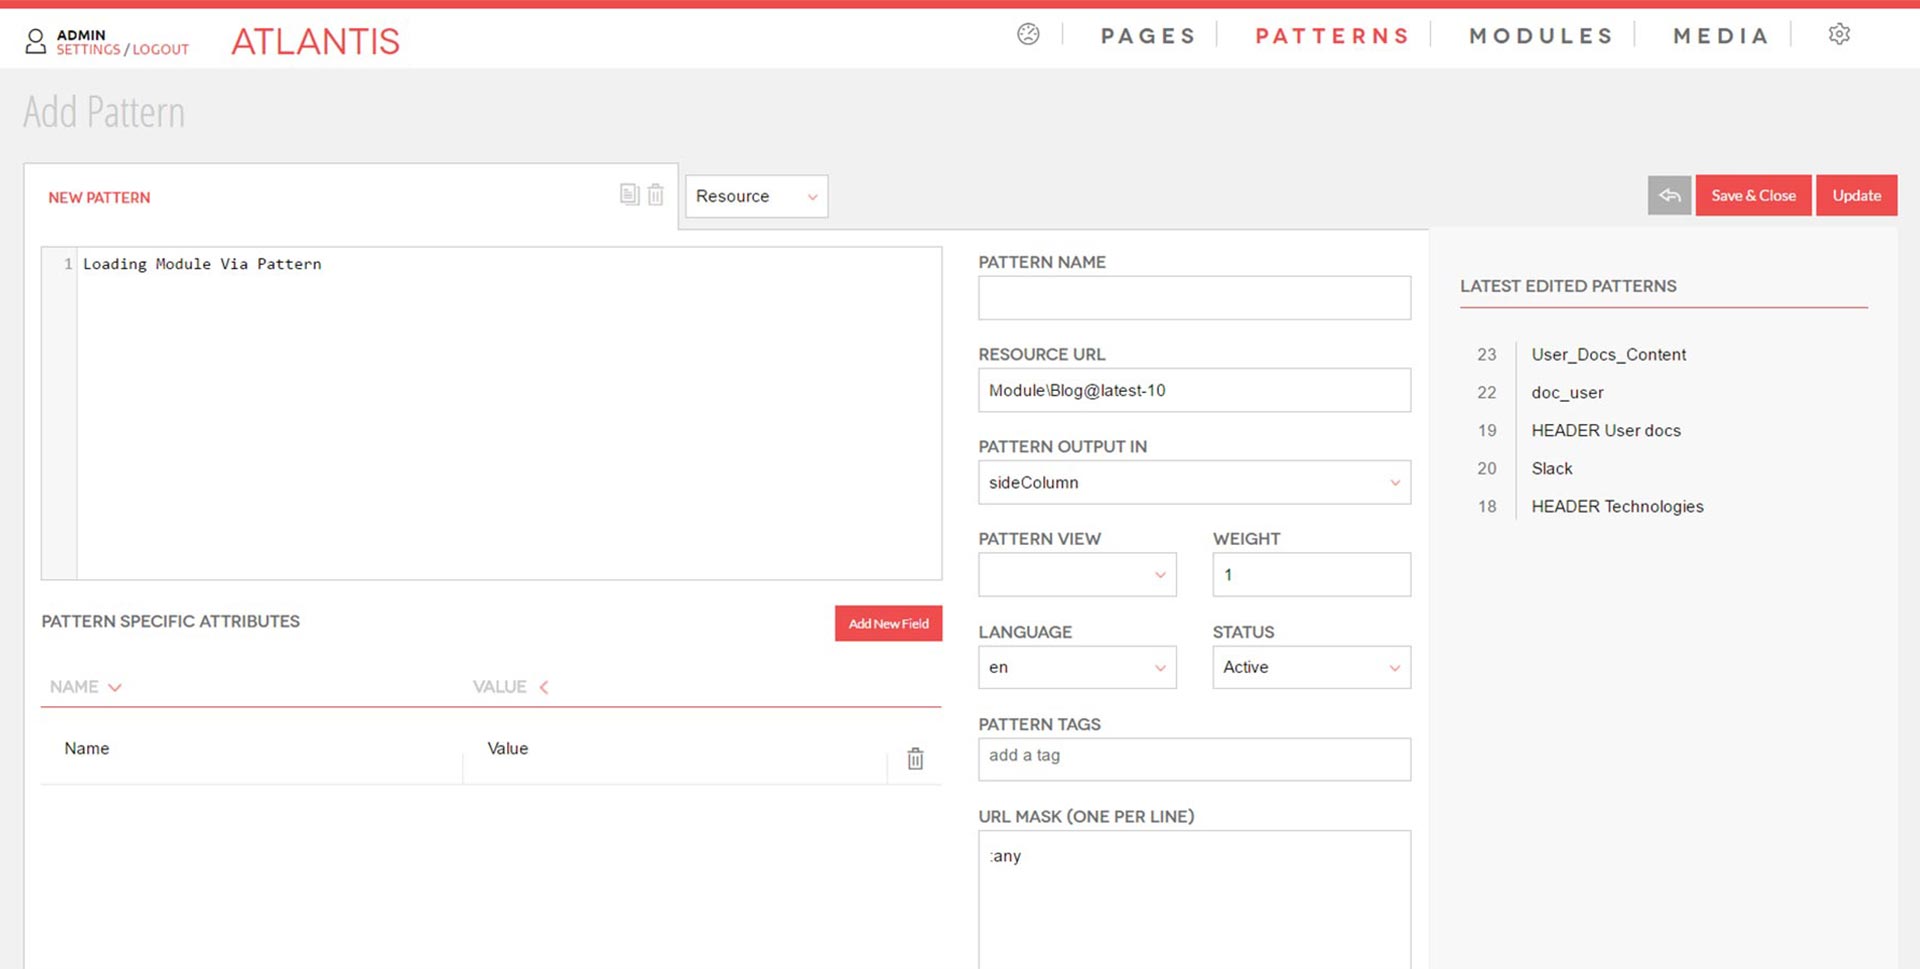
So for example let’s pretend that we want to load a module in the footer of the website but only on specific pages.
First, you want to create your pattern and make it of type “resource”. This will notify Atlantis that this pattern is only a proxy for a module. Then in the ‘Resource URL’ field of the pattern you want to make the call the module as follows:
Module\Blog@latest-10If you want to pass multiple parameters to your method you need to separate them with commas like this:
Module\Blog@latest-10,param1,param2Then you adjust the mask of the pattern. Based on your current theme and the resource positions it features the name might vary but for the purposes of the example let’s assume the position is called “footer”. So you want to tell your pattern that it will output itself at that position in the “pattern outputs” field. ( output dropdown is generated based of the positions your theme features. Check ‘building a theme’ ).
That’s it! You now have the power of directing dynamic content using URL masking of the patterns and the complexity of a module available.
Building a Module
Modules are used to extend the functionality of the CMS and provide additional functionality for the Atlantis core.
Creating the Module Structure
The structure of the module is rather complex set of classes organized in specific way and creating it manually is rather a time consuming task. A3 provides an excellent tool to save you the trouble and generate a blank module structure using one line command:
php artisan atlantis:create:module [modulename]You are going to be prompted for the directory name.( Do you want to change default directory "/atlantis"? ). Blank module structure will be created under /modules/atlantis if you press enter here, however we encourage you to create your modules using your identification. For example, entering john_d will create /modules/john_d/[modulename].
That's it! You now have module structure created.
2. Initial Configuration and Setup
Under your newly create module you will find a folder ( modules/[folder]/[modulename]/src/Module/[ModuleName]/Setup ) which contains 2 files : Config.php and Setup.php
Config.php
By default each module exposes only 1 front-end and 1 back-end controller, however here you can expose additional controllers via binding
appBind => ['Module\[ModuleName]' => 'Module\\[ModuleName]\\Controllers\\[Additional]Controller' ] Setup.php
This file contains the information A3 needs to interact and setup the module during installation like : the module's name,version,author,namespaces etc. Each module also needs to export an icon to be used in the admin. We support Font Awesome for icons and all you need to do is to add the class for the icon like ‘fa fa-[Icon]’. Font Awesome has a huge database of icons that be browsed at: their website
2.1 Routing
In the root folder of each module resides the routes.php file which holds module specific only routes. By default the route is commented out so that the module is not unintentionally loaded and so you will have to uncomment that. If you also need to expose module specific routes you will have to add them here as well.
2.2 Module.json
You need this file if you want to publish your module into the Atlantis modules repository ( http://modules.atlantis-cms.com ) where it can be downloaded from other people. Even if you delete it and try to publish the file will be created for you. In order to publish modules you will have to first create an account. Once you are done and you want to publish your module all you need to do is to issue this command from the shell
php artisan atlantis:publish:module [modulename] This will ask for your credentials and it will package and upload the module for you into the modules repository. Don’t forget to change the version numbers in module.json when uploading a new version.
2.3 Migrations and Seeds
Both Migrations and Seeds follow the standard Laravel format and are no different than any other you ever did for Laravel. The difference here is that on install time Atlantis will attempt to run them both. You can however run a migration manually from the shell issuing the following
php artisan atlantis:migrate:module ‘Module\Name’Notice here that you need to pass as parameter the module namespace instead of just its name.
The Module Service Provider
The service provider is just like any other Laravel service provider but here it’s used to primarily deal only with module specific tasks. Let’s take a look.
- The ‘register’ method: this is pretty much set for you, however notice that by default it exports only 1 event subscriber. If you want more the place to register them is here.
-
The ‘boot’ method is also populated on generation time, but by default it does not have a directive for loading
translations. If you want to add one add this line to the method :
copyThis will direct the module to search translations from a directory called Languages. This folder should contain subfolders with the two-letter abbreviation of the language ( ISO 639-1) . Respectively each language folder should contain 2 files : messages.php and validation.php. The artisan command will generate a validation file for you with quite a lot of standard validation rules. If you need more you can always add them there.The messages file is just a list of key/value pairs. In your modules you can call a message by using :
$this->loadTranslationsFrom(__DIR__ . '/../Languages', "[module]");copytrans('[modulename]::file.key')
Loading assets from the Service Provider.
-
You can have your module loading assets on boot time by using the follоwing the service provider boot method
copy\Atlantis\Helpers\Assets::registerScript('[path-to-script]', [weight]); -
Path to script can be either a local file from your module structure as well as URL to external script. Weight defines where in the stack your script should load. The bigger the number the lower in the stack it will go. You can also load inline JavaScript using this:
copy\Atlantis\Helpers\Assets::registerJs('[javascript]', [weight]);This will enable you to post strings that contain JavaScript inline and it will be loaded after all the scripts registered with registerScript are loaded in the footer.
-
copy
\Atlantis\Helpers\Assets::registerStyle([path-to-style])This lets you load CSS file which are module specific
-
copy
\Atlantis\Helpers\Assets::registerHeadTag([tag])This command will let you load custom tags between the 'head' tags of your page.
Execution scope
Notice that all of these commands could also be issued by the front-end controller of the module, however this makes the calls more globally available and keeps the controller’s code cleaner.
The Search Provider
A3 introduces a mechanism for registering search results from your modules. Basically once the search.providers event occurs we will register a model and weight for it. The higher the number of the weight is the lower in the stack the results of your module will appear.
\Atlantis\Helpers\Assets::registerHeadTag([tag])Implementing the Search Provider
The class you have registered in the Module Service Provider to respond to search queries has to implement a static method get
public static function get($search)This method has to return an array containing a URL for the result and a string found like:
$results[ [url] ] = [title]What fields to be searched on and how is entirely up to you.
Using this technique one can choose whether the module will provide search results to the system.
4. Models and Repositories
The A3 ideology is to separate models from their respective repositories. That being said you will find a folder called Repositories under the Models in the module you are building. We generally use Eloquent so the models and Repositories are not different than any Laravel model.
5. The Controllers
A3 modules have by default 2 controllers, one for the front-end and one for the back-end.
5.1 The Front-end controller
This controller will reside directly in the Controllers folder. It provides methods used in the presentation layer of the module. Due to the default routing ( routing to controller not to methods ) you will have to prefix your methods with either ‘get’ or ‘post’ keywords to inform Laravel of which http method this particular method needs to respond to. The installation command will create an entry in the ServiceProvider on where to search for views. By default it is in a folder called Views under the module.
Laravel 5.3 Route Change
If you are running the latest Atlantis version, it will install Laravel 5.3. In that version Laravel has removed the Route::controller() and one has to define explicit Route::get() and Route::post() or use Route::resource()
5.2 Ajax methods
To be able to issue ajax calls, there are few things you will have to do before hand due to the nature of Laravel. First somewhere in your template you will have to add a tag like this
meta name="_token" value="{{ csrf_token() }}"
This will allow the CSRF token to be passed along with the request. In your JavaScript ( assuming you are using jQuery ) you will need something like this:
$.ajaxSetup({
	headers: {
	    'X-CSRF-TOKEN': $('meta[name="_token"]').val()
	}
});
Of course you can use any other element you want as long as you can send the CSRF token value to the ajax header. For more information, please check: https://laravel.com/docs/5.2/routing#csrf-x-csrf-token
5.3 The Admin controller
The Admin controller takes care of all the administrative functionality of a module. Again methods here are split with get and post prefixes based on their usage. Normally we use DataTables to display table data and there is a built-in helper for them. You need to call it in your admin template like this:
{!! \Atlantis\Helpers\DataTable::set('Module\[ModuleName]\Models\[ModelName]DataTable') !!}You can place the class anywhere really, but we generally tend to keep them under the Models folder. You can find a demo implementation here.
5.4 Working with views
All the views are blade templates and every view can be overwritten by the default theme. For example, if the module’s controller calls for a view “master.blade.php” and in your current theme there is a folder [theme]/modules/[modulename]/views containing also a file called “master.blade.php” the module will load the view from your theme. This is done so every module can be “skinned” based on the current theme and without having to mess with the original module view code. There is one additional tag that you can use in your templates and that is {{$_storage}}, this is if you want to use the built-in Amazon S3 and Cloudfront integrations. If there are no values set for them {{$_storage}} will return “/” , and if there are it will return the URLs which you have provided in the configuration.
5.5 Events
List of System Wide Events
| page.loaded | Fires when page is loaded in the CMS. |
| page.added | Fires when new page is created in the CMS. Since 1.0.16. |
| page.edited | Fires when page is edited in the CMS. Since 1.0.16. |
| page.deleted | Fires when page is deleted from the CMS. Since 1.0.16. |
| page.prediscovery | CMS has started loading but the page load procedures are not done yet. |
| page.title | Document page title. |
| page.body | Fired when page is resolved, sets page title. |
| page.body_class | Sets the body class per page. |
| page.seo_title | Sets SEO title. |
| page.meta_keywords | Sets Meta Keywords. |
| page.meta_description | Sets Meta Description. |
| page.template | Override the page template before the page is outputted. |
| page.tracking_header | Sets tracking scripts in header. |
| page.tracking_footer | Sets tracking scripts in footer. |
| pattern.added | Fires when new pattern is created in the CMS. Since 1.0.16. |
| pattern.edited | Fires when pattern is edited in the CMS. Since 1.0.16. |
| pattern.deleted | Fires when pattern is deleted from the CMS. Since 1.0.16. |
| module.loaded | Checks if module is loaded. |
| search.providers | Loads search providers. |
| file.uploaded | Fires when file is uploaded in Media. |
| admin.login | Fires when admin login is detected. |
| user.created | Fires when new user is created in the Users admin. Sends an object with the newly created user info as parameter. |
| user.updated | Fires when user is updated in the Users admin. Sends an object with the user info as parameter. |
| user.deleted | Fires when user is deleted from the Users admin. Sends an object with the user info as parameter. |
| form.submitted | Fires when form is submitted succesfully. Sends the entire form data as parameter. |
Atlantis is heavily relying on events to execute specific tasks at specific runtime and modules are no different. ( see a list of all system events here ). You can subscribe your module to listen to any system event. The module artisan command will create folder and class structure for that. For example let’s say that we want to listen to the system page.title event
public function subscribe($events)
{
    $events->listen('page.title', 'Module\Blog\Events\Event@pageTitle');
}
Then we need to implement what is going to happen when this event occurs
public function pageTitle()
{
    $t = \App::make('Transport');

    if(!empty(\Module\Blog\Controllers\BlogController::$title))
    {
        $t->setEventValue("page.title", ["title" => \Module\Blog\Controllers\BlogController::$title, "weight" => 10], TRUE);
    }
}
So the interesting parts here are the weight parameter and the last boolean parameter. Imagine the events as a stack, so all the subscribers to that event are sending their responses and the stack is ordered by the weight parameter. So the higher you want your results to be in the stack the lower the number should be. However, note the last boolean parameter - if you need to unset the entire stack and only have this particular implementation be the only result in the stack then you pass the TRUE parameter as it’s shown in the example. This means that no matter what the other event subscribers might be sending this will be the only result left in the stack before its output.
Loading the default system editor for use in your module
If you want to provide your users with an access to whatever the currently installed wysiwyg in the system, there is an easy one liner:
{!! \Editor::set('body', old('body'), ['rows' => 15, 'id' => 'custom_form']) !!}Note that this is just an interface to whatever the user has chosen to use as an editor. This current example shows the usage of CKEditor with HTML element name attribute which equals to “body” , the second parameter is used to display the content again inside the editor in case the form was submitted with an error and the last parameter is an array with HTML properties.
The System "Site" Module
There is a special module called ‘site’ that comes with your installation. Reason behind is to be able to write site specific code in one consistent place. You can put site specific models, controllers or anything else you might need. This module is always available and it won’t show in the module panel in the admin.
Extending functionality with Traits
It’s a messy business to write custom code inside modules and then not be able to update them because the update will overwrite your changes so for this reason every module controller uses a trait that will reside in its Traits folder. By default you don’t need to write any code in that folder to start using this mechanism but you will find this in the trait:
if (class_exists('Module\Site\Controllers\Modules\BlogController')) {
    return \App::make('Module\Site\Controllers\Modules\BlogController')->$name($params);
}
Basically this checks if you have implemented an additional controller in the Site module ( remember we put site specific things there ). If you have implemented such a class its methods will become available to Atlantis immediately via the trait. To make more sense of this let’s imagine the following scenario:
- You want to implement new method for the Blog module, however you don’t want to write code in the provided module
- You want your new method to be accessible via the data-pattern-func tags.
If you implement a class under Module\Site\Controllers\Modules\BlogController with a method name of, let’s say, “mycustom”, because of the trait this method will be immediately available to the attribute. As you can see the parameters will be passed as an array of arguments to your method. Really nothing to do here but to implement your own functionality!
Using the AtlantisCache Helper
You want to save resources to make your websites run faster, query caching is one way to help with that. We recommend using the AtlantisCache helper like this:
return AtlantisCache::rememberQuery( (string) [unique-key], (array) [ parameters ] , function() use((array) [parameters]){ return [your query] });The important part here is that you have to create a unique key so that the cache knows where to store your resource. This applies also for single entries inside your module as well, so for example if you are writing a blog application the key may be something like ‘blog-entry-NN’ , where NN is the ID of the entry.
To clear the cache use
AtlantisCache::clearAll();Currently it is not possible to clear only specific cache keys, but rather the entire cache.
Set Configuration
AtlantisCache is just a wrapper that helps the CMS work with Laravel's built-in cache mechanism. You still need to adjust your prefered driver in Laravel configuration.
Using the Image Uploader
We have created a powerful media section and you can tap into it using that helper. Really no need to create your own image uploaders. There is an option to select whether to allow the upload of only a single or multiple images. To embed single image selector into your view, you need the following line of code:
\MediaTools::createImageSelector([resize_option = null, [multi_images: bool = false], [image_ids : array = array], [name : string = 'imgs[]'] ) - resize_option: If you have created an image preset in the Config you can specify it here and when the image uploader opens up it will have that preset selected
- multi_images: whether the selector to allow the user to upload/select multiple images
-
image_ids: when you show edit screen and want to display already selected images from the user you populate
this array with image id’s and the widget will pull the corresponding thumbs. And for the gallery selector
copy
\MediaTools::createGallerySelector([selected_gallery: int = 0], [name : string = 'gallery_id']) - selected_gallery: if you want the widget to start with a preselected gallery pass in the id.
Publishing your module to modules.atlantis-cms.com
We have made an easy way for you to publish your modules to the public repository straight from the command line. What you need to do is run the following line:
php artisan atlantis:publish:moduleThis is an extremely easy way to publish publically visible modules that anybody can use. We do store every version of the module you publish so your users can always rollback if necessary.
Admin Dashboard Widgets
Each module can export an admin dashboard widget and users can choose which widgets they want to see on the admin dashboard. Visible size of the widget is determined by columns ( think in a sense of CSS grid columns ) and it can be one of the following : 3,6,9 or 12 columns. The way your module can create a widget is by utilizing the Widget class, which you need to extend. There are 4 methods you need to overload in order to implement your widget
- title() - returns the title of the widget.
- size() - size , use one of the following:
- const SMALL = 3;
- const MEDIUM = 6;
- const LARGE = 9;
- const EXTRA_LARGE = 12;
- view() this method needs to output the view of your widget. You can find a premade structure for the view inside a module generated with php artisan atlantis:create:module
- description() returns description for the widget .
Building a Theme
The themes in Atlantis 3 reside under /resources/themes/[themename]. The structure is like this:
- assets - The directory contains CSS, JavaScript and other theme assets
- config.php - the main configuration file
- lang - language files separated in subfolders per language
- screenshot.png - a preview screenshot for the theme to be used in the admin
- views
The configuration file resembles the following:
'name' => 'Theme 101',
'version' => 1,
'author' => 'Atlantis team',
'description' => 'Default Atlantis 3 Theme',
'screenshot' => 'screenshot.png',
'pattern_outputs' => [
'patt_footer' => 'footer (output variable description)',
'patt_header' => 'header (some description for variable)'
]
This file is pretty self-explanatory, but there is one interesting part that will require more explanation. The ‘pattern outputs’ defines variables that your theme will offer inside the ‘pattern outputs in’ section under Patterns in the admin. Think of this as the ‘zones’ where patterns can output content. These are not per page but globally available for selection from any pattern. The theme outermost part is the shell file. What shell file to be used globally no matter what your current active theme is, can be chosen in Config/Default - Front End Shell View.
By default that is “page/shell” which corresponds to resources/themes/[theme]/views/page/shell.blade.php This file contains the opening and closing html, head and body tags as well as some special sections generated by the system. Shell file is relative to your current theme, which means that every theme should be implementing a file like that. The sections styles and scripts will hold the values generated by the system based on what you have entered in the Config section of the admin as well as scripts or styles exported by modules. There is a system-wide helper to make it easier to make paths to assets
config('atlantis.theme_path') - this will always return the path to the active theme. Section ‘body’ is where the content of the page templates comes in. This section is where the page specific templates load. Each page specific template must extend the shell like this at its very beginning
extends('atlantis::' . config('atlantis.frontend_shell_view')) You can style and organize your pages in as many templates as you need. Once saved in the theme they will become available in the Pages part of the admin under the ‘page template’ dropdown. Think of them as skins applied per page.
Next level will be patterns (see Patterns section for more explanation) You can style and organize your pages in as many templates as you need. Once saved in the theme they will become available in the Pages part of the admin under the ‘page template’ dropdown. Think of them as skins applied per page. Next level will be patterns ( see Patterns section for more explanation )
Using the data tags in your pages.
In Atlantis 3 we use HTML5 style tags to load dynamic resources directly into your page body content. There are generally 3 available tags for loading resources:
data-pattern-id=”[NNN”] - this will load pattern based on its ID
data-pattern-name=”[NNN]” - this will load pattern based on its Name
Direct Loading
Note that when you load patterns this way, their URL masks are disregarded and resource is loaded directly on the page.
For the 3rd type check the following 2 topics:
Calling modules inside the editor
This is probably one of the most important usages of the tag. This will allow you to load a module directly in the page body. So imagine that we want to load the latest 10 blog posts we will do something like this:
And in your method parameter array we will also pass any HTML data tags you might have, like this:
All the data tags must be called as attributes of an HTML tag and they will use it as a container and replace its content.
Global Styles and Scripts
Under the Config section You will find two boxes - Default Scripts and Default Styles. All of the scripts or styles that might come from your modules will be loaded after the defaults. However, notice that the path to the global styles and scripts is relative to your current theme. So when adding a script for example all you need to add is: assets/js/[scriptname]
Excluded Scripts
Sometimes your modules might try to export and load a version of lib you already have loaded or you have a newer version or for any other reason you don’t need. In this case you can get the URL of the library that the module is loading and paste it into this box.
Image Presets
You can create image presets for the media uploader that can be reused later when uploading images to direct A3 what to do. There are two types of image presets - Static Images and Responsive Images. Static images are the same for all devices and are in the format of Preset Name/[big size]/[thumbnail] or for example Demo Static/1600x930/1600x930xC Note the XC modifier in the thumbnail part of the declaration - C stands for “crop” , it directs the system to always crop the thumbnail to that particular size, where if you omit the modifier the thumbnail will be proportionally scaled down but not cropped.
Retrieving an image by ID
MediaTools::getImage((int) [image_id])The code above returns an object representing the current image.
Getting Related Pages By Tag
PagesTools::getRelatedByTag((array) [tags], [(bool) random = TRUE] , [(int) amount])You can easily pull related pages by tag using this call, this will return collection of page objects you can loop over.